Exploring WordPress Robots.txt: Functions and Rules
If you have been searching online about SEO and other tips to optimize your website, then you must’ve read somewhere about robots.txt.
In this guide, I’ll briefly explain the function of robots.txt and what rules you can give it. Naturally, I’ll explain the methods of how you can easily create one on your site.
What is the function of a WordPress robots.txt?
The robots.txt is basically a file on your website that tells search engines like Google how to crawl the pages on your site (like restricting their access to some pages).
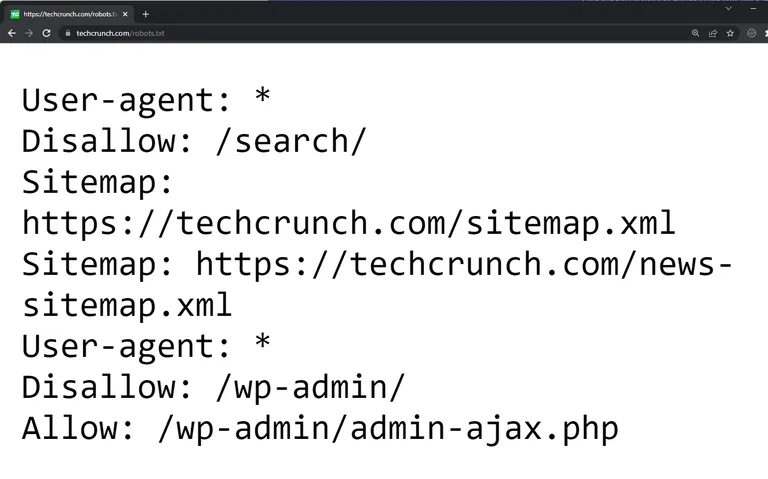
It’s simply a set of instructions stored in the root directory of your website. Here’s an example from techcrunch.com:
A robots.txt file has two benefits:
- Encourages search engines to focus crawling and indexing on the pages that matter the most (and not waste time on pages you don’t want to get indexed)
- Blocks bots that waste resources to optimize server usage
If your website is new and you only have a few pages, creating a robots.txt file might not have that great benefit for you.
However, for big sites, having control over how search engines crawl and index your pages will benefit you for one single reason (which makes the benefits earlier make sense):
Search engine bots have a crawl quota or limit for each website in one session.
It’s possible that they won’t be able to crawl all your pages at once. That’s why creating a robots.txt might allow search engine crawlers to focus on the pages you want to get crawled and indexed.
How to create a WordPress robots.txt file?
There are a few options on how to create a robots.txt file for your website.
One of them is to manually create your own file offline (using a text editor like Notepad) and upload it to your server.
But if you want to create one quickly, you can use Yoast or All In One SEO.
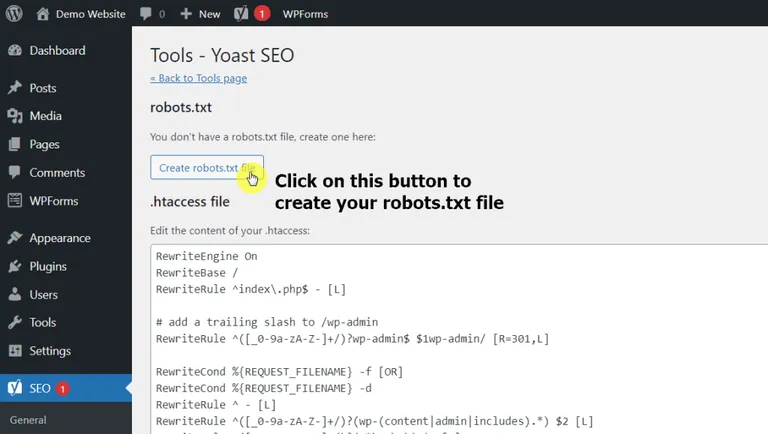
If you use Yoast, simply head over to the “Tools” page of the plugin and click on the “File editor” button on the page.
Creating a robots.txt file with Yoast:

On the next page, the plugin will tell you if you already have a robots.txt file or not.
Click on the “Create robots.txt file” button to create one.
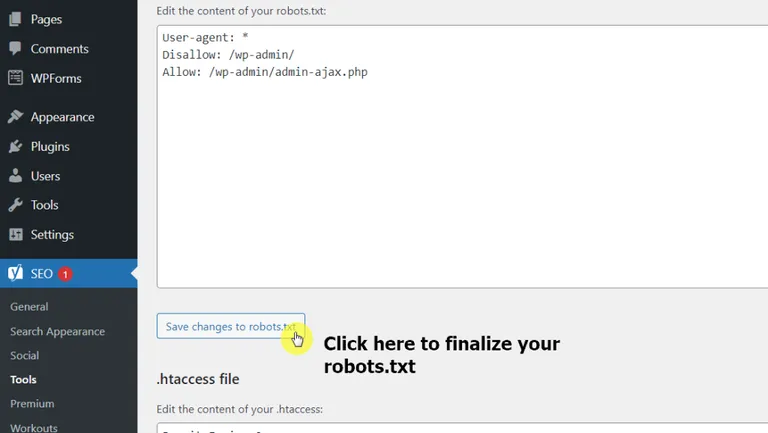
You will then be able to edit the content of your robots.txt. This is the same place you need to visit later on if you want to add more commands to the file.
For now, click on the “Save changes to robots.txt” to finally create the file.
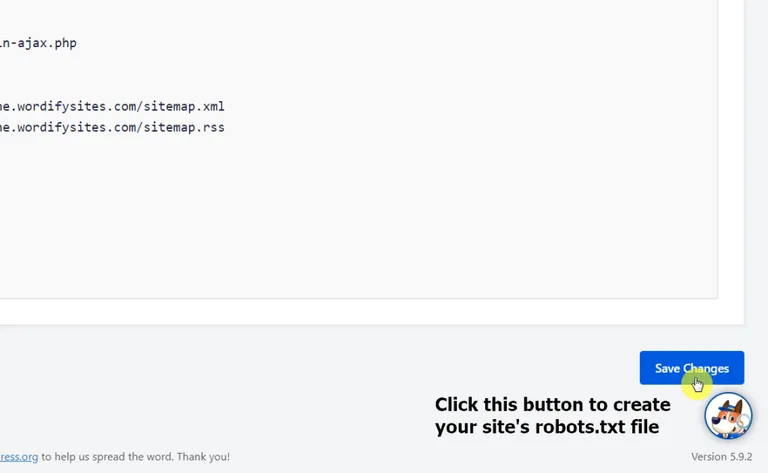
Creating a robots.txt file with All In One SEO:
If you use All In One SEO, head over to the “Tools” page and you will see the “Robots.txt Editor” tab right away.
Click on the “Enable Custom Robots.txt” slider to activate the editor.
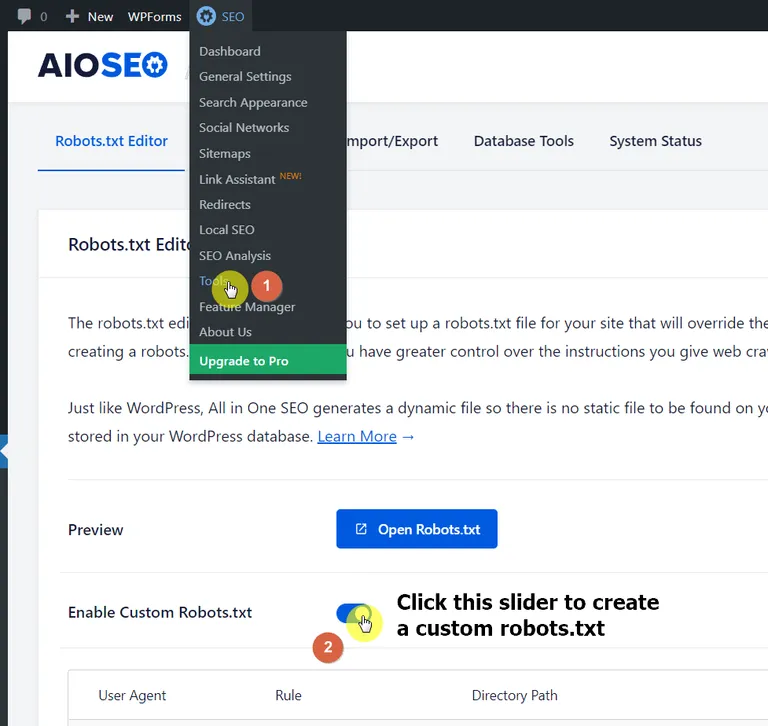
As you can see, the Robots.txt Editor here is easier to use and understand. You can directly add new rules without having to know the codes themselves.
But anyway, click on the “Save Changes” to finally create your site’s robots.txt file.
What rules can you include in the robots.txt file?
Creating a rule in the robots.txt file is easier than you might imagine.
For starters, you only need to know two things:
- User Agent
- Rule (Allow or Disallow)
Now, instead of telling you how to formulate your own rules, I’ll straight away provide you with some rules you might find interesting or helpful:
Restrict all crawler bots from accessing your site pages:
User-agent: *
Disallow: /
This almost doesn’t happen with a live site — but may help with a site that’s still in the development stages.
The asterisk functions like a catch all code that addresses all user agents or bots while the slash in the “Disallow” part means disallowing access to all pages in the domain.
Restrict a specific bot from crawling your site pages:
User-agent: baiduspider
Disallow: /
Check this website for more user agent strings. Replacing the asterisk with a single user agent means the rule stated below it would apply only to that user agent.
Restrict bots from accessing a specific folder or file on your site:
User-agent: *
Disallow: /wp-admin/
Disallow: /wp-login.php
The rule clearly means to restrict all bots from crawling wp-admin and wp-login.php. When you include a folder in the rule, it applies to all its subfolders.
Allow bots access to a specified file in a restricted folder:
User-agent: *
Disallow: /wp-admin/
Allow: /wp-admin/admin-file.php
The snippet following “Allow” basically exempts the admin-file.php from the “Disallow” rule.
Restrict bots from crawling WordPress search results:
User-agent: *
Disallow: /?s=
Disallow: /search/
The “?s=” is a query parameter in WordPress. Using that in the “Disallow” parameter stops search engine crawlers from crawling the results from queries.
Create a different rule for different bots:
User-agent: *
Disallow: /wp-admin/
User-agent: baiduspider
Disallow: /
You can basically mix and match the rules and create different ones for different bots. The parameters will only apply to the user agent specified above it.
Note: Using the “Disallow” command isn’t the same as using the “noindex” tag. There is still a chance that search engines will crawl the pages or files you specified in the “Disallow” parameter if there are other pages that link to those pages and files.
Creating a robots.txt helps bots focus their crawling juice to pages that matter.
Although creating a robots.txt may not be a priority for new sites, you should definitely think about it when you start producing lots of content.
Did you find this guide helpful? What rules are you thinking of including in your robots.txt? Share them below in the comment section.