WordPress Security Guide: How to Keep WordPress Site Safe
Whether you’re a small business owner, a web developer, a design agency, or simply an enthusiast, as long as you have a WordPress website, there will always be security risks from hackers. ⚠
The brutal truth is: hacking attacks on your website are inevitable. Most of these attacks are from scripts that scan the internet to look for vulnerabilities. These scripts aren’t designed to specifically target just one website — which is why every website is literally a target.
For that reason, we created this WordPress security guide for you — to teach you how to protect your website from security risks. And if you’re wondering if you need technical expertise to do this, rest assured, you will not. 😉
If you want to jump to certain sections of this article, simply click on the content right down below:
- What is website security and why is it important?
- Keep your WordPress software up-to-date
- Use strong passwords
- Back up your WordPress website
- Choose a better web hosting service
- Deploy WordPress security plugins
- Install an SSL Certificate
- Take precaution against file uploads
- Implement a two-factor authentication
- Limit login attempts
- And disable the file editing feature
Let’s go!
What is website security and why is it important?
Website security refers to safeguarding your website from cyberattacks. Like protecting precious treasures from robbers, website security isn’t a one-time event. It’s an on-going process — a part of your website management.
The reason why securing your WordPress website needs to be updated regularly is because security threats are evolving too. If you don’t update the installed security measures, time will come that they will be overwhelmed. (Trust us, you won’t like that.)
But why do you need to boost your website’s security? Contrary to what others believed, a hacking attack’s purpose isn’t always to steal money or information. It could be to:
- Use the server for malicious or illegal activities
- Utilize the website for black-hat SEO
- Exploit the site’s visitors
- Install a ransomware
- And many others
If you’re serious about your website, there’s no other way to protect it from cyberattacks than to beef up your website’s security. Check out the steps below and see how you can increase your WordPress website’s safety measures. ✅
Keep WordPress software updated
WordPress is a free open-source content management system with regular updates. Usually, there’s nothing to worry about updating WordPress since WordPress automatically installs updates.
However, major updates or releases have to be done manually. Failing to do so could be fatal to your site as new updates usually cover known vulnerabilities that exist in the earlier versions of WordPress.
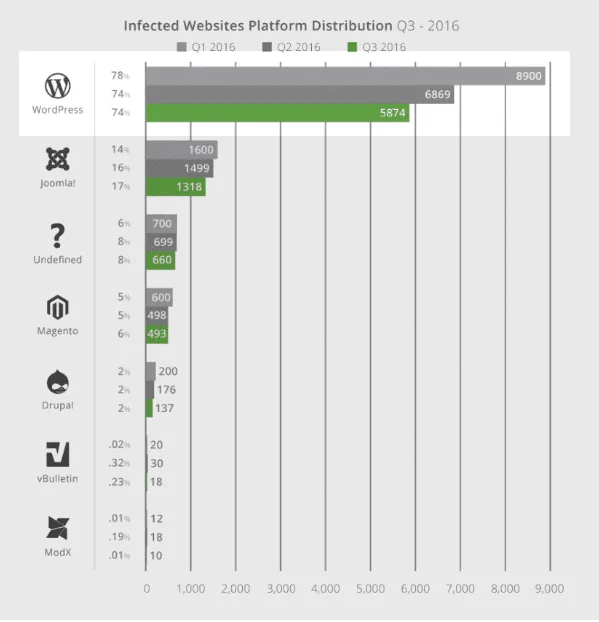
Last 2016, Sucuri released its Hacked Website Report where 8,000 infected websites were analyzed. Surprisingly, 74% of the websites were from WordPress. During this period, Sucuri noticed a 6% increase in out-of-date, vulnerable versions of WordPress installations.
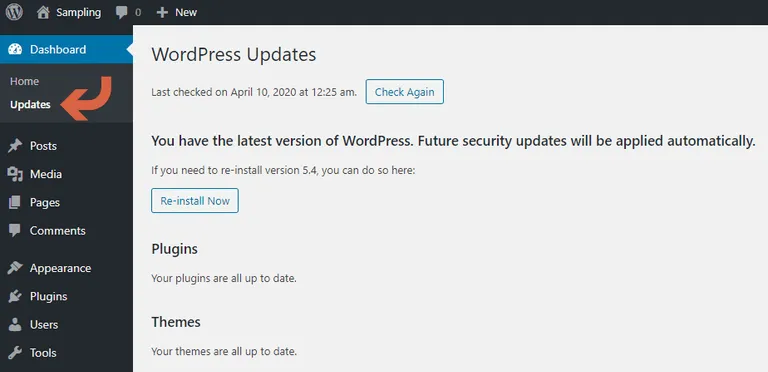
Updating your WordPress software is easy. Generally, if there’s a new major update and you haven’t updated yours yet, WordPress will let you know. You can also check it manually and see if you already have the latest updates.
To do so, simply click the “Updates” on the left-hand side menu and you’ll see the status of the updates.
These WordPress updates are important. Make sure to keep your WordPress software updated, along with the plugins and themes installed. They are crucial to your website’s security and stability.
Use strong passwords
It’s tempting to use “password”, “1234”, or even your birthday as the password. Having many hard-to-remember passwords is…hard. Unfortunately, if you don’t want to risk your WordPress website, you have to use complicated passwords.
According to the 2017 Data Breach Investigations Report, 80% of hacking-related breaches are tied to passwords. Using stolen passwords is the most common attempt hackers use to take hold of a website.
Hackers use a method called “brute force attacks” to gain access to a website. This is done by entering usernames and passwords until it gets the right combination and gains entry to your website. The technical process involved in this method can also cause your website to crash.
That’s why it’s important to make your passwords stronger. For starters, make sure your passwords are:
- Hard to guess but easy to remember
- Complicated by including upper and lower case letters, number, and special characters
- Not composed of common passwords (like 123456789, qwerty, password, your birthday, your name, etc.)
If you want to do it the easier way, use a password manager like LastPass. It’s free and you don’t need to remember all your passwords anymore — just your master password. 🔐
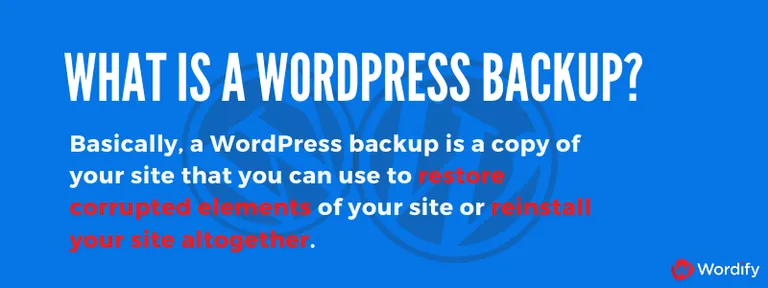
Prepare WordPress backups
Here’s another brutal truth: there’s no 100% WordPress security. You may have done everything that’s listed on this WordPress security tutorial plus more. However, your website could still end up with a major security incident. (When this happens, you’ll be glad you made a backup copy of your website.)
Backing up your WordPress website allows you to quickly recover your website and files in case your website gets attacked. In addition, having a copy of your WordPress site allows you to reinstall your website completely or restore any corrupted elements.
Technically, there are two ways to backup a website:
- Manual backup using cPanel and PHPMyAdmin
- Automatic backup using WordPress backup plugins
Of the two, it’s obvious that it’s easier to just use backup plugins like UpdraftPlus to back up your site. However, you should still do manual backups and save them on your local drive. Performing a manual backup isn’t really hard, but it’s not a one-click solution. Check out our definitive guide for backing up a WordPress website.
Note that WordPress backup isn’t a replacement for security. But it’s importance is nearly as much. This is a contingency plan in case something unexpected happens to your site. 😊
Choose a better web host
There are different types of web hosting like shared hosting, VPS (Virtual Private Server) hosting, managed hosting, cloud hosting, etc. Shared hosting is the most popular of them all.
Fortunately, most of the popular web hosting services practice common precautions against security threats:
- Monitoring the network for any malicious activities
- Keeping network software and hardware regularly updated
- Deploying tools against DDOS (Distributed Denial-of-Service) attacks
- And recovery plans
Websites using shared web hosting services are at risk of cross-site contamination. With a shared web hosting plan, websites share resources under the same server. As a result, if a website gets hacked, there’s a huge chance that all websites under that server would be infiltrated.
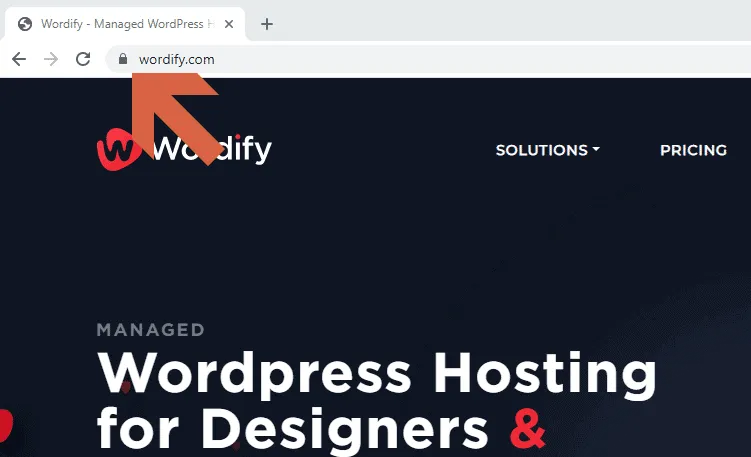
If you want to be safe and save time and resources down the road, use a managed WordPress hosting (like Wordify 😉). Using a managed WordPress hosting service provides more protection to your website because it has:
- Automatic WordPress core updates
- Automatic daily (scheduled) backups
- Server-level and performance-enhancing caching
- Enhanced site security
Using a managed WordPress hosting service is safer for your website — no strings attached. 😊
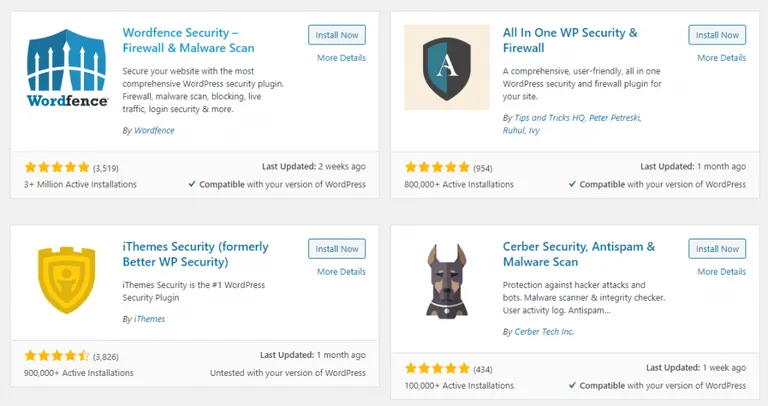
Use WordPress security plugins
Using WordPress security plugins is one of the easiest, non-technical ways to keep your website safe from risks. All you have to do is install and activate them.
There are different security plugins available and many of them are free to use. Most of them have features like:
- Malware scanner
- Integrity monitoring
- Application malfunction detection
- Attack and exploit trigger alerts
- And many more
Some of the most popular plugins out there include Sucuri, Wordfence, iThemes, and others. In addition, most of these plugins offer a web application firewall that blocks malicious traffic if you’re willing to shell out more cash.
Although you can actually leave these plugins running by themselves, make sure to regularly check for updates and apply them so you’ll get the latest security patches. Once you see WordPress notifying you about a plugin update, check it right away.
Install an SSL Certificate
Have you noticed the locked padlock icon 🔒 on the address bar if the website uses HTTPS (emphasis on the “S”)? If a website has an SSL certificate, you’ll see an HTTPS on the address bar.
An SSL (Secure Sockets Layer) certificate encrypts the data transferred between the web server (host) and the web browser (the client). This protocol helps ensure that the data exchanged will not be intercepted and no one will be able to steal the information.
Most browsers nowadays warn users when a website isn’t SSL-certified. Instead of a locked padlock, you’ll see “Not secure” or sometimes, a warning or error. This is to warn visitors to avoid inputting any information on the site as it may be compromised.
Fortunately, it’s easy to grab an SSL certificate for your WordPress site. Most website hosting services and website builder includes a free SSL. For example, all hosting plans in Wordify include free SSL certificates automatically provisioned in under two minutes. But if your hosting plan doesn’t include a free SSL certificate, you can get one from a non-profit organization called Let’s Encrypt.
Be wary of file uploads
If your WordPress website allows its visitors to upload files, others with malicious intent may upload harmful files. Consequently, these files may potentially give these people access to your database, overwrite an existing file, or even make your website crash.
If possible, don’t allow your site visitors to upload anything. But if you must, make sure to:
- Specify the types of files to accept by creating a whitelist
- Verify the uploaded files
- Set a maximum file size
- Deploy an antivirus software to check these files
- Rename the uploaded files automatically
- Direct the files to a folder outside your website’s database
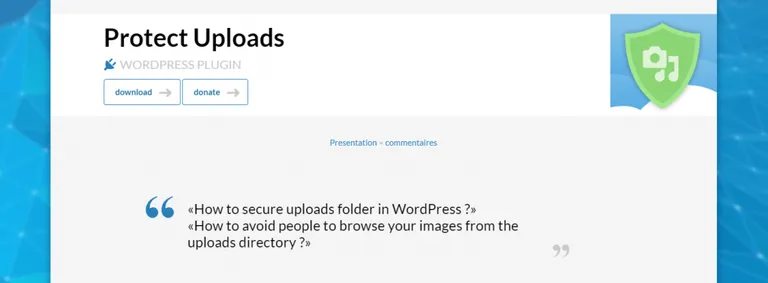
You can also use a plugin like Protect Uploads to prevent anyone from sniffing through your media directory. This plugin adds an index.php file on the upload directory root to hide the folder. It also sets up a .htaccess file that returns a 403 error (Forbidden Access).
In case you want to totally restrict any file uploads, you can use the WP Upload Restriction plugin. ⛔
Implement a two-factor authentication
Popular online platforms like Facebook and Gmail use two-factor authentication for a reason: to verify, in real-time, the user attempting to log in by using a password sent to another device, app, or alternate email.
The easiest way to do this is by using the Two-Factor plugin.
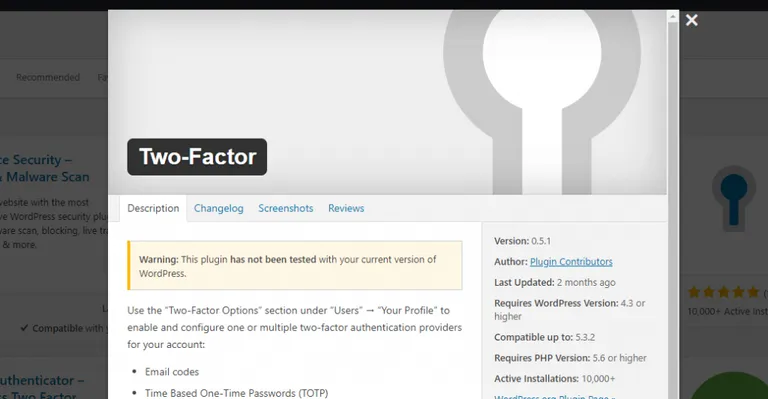
Once you log in, you will be asked to enter the code or password sent to your app/device/email of choice. With this, no one will be able to log in to your website without verifying it first. ✅
Limit login attempts
By default, you may enter a username and a password incorrectly as many times as you can without the website locking on itself. Because of this default feature, hackers may try to use thousands of username and password combinations to gain access to your website.
Luckily, the solution to this is easy. There are many limit login plugins on WordPress like WPS Limit Login and WP Limit Login Attempts you can use.
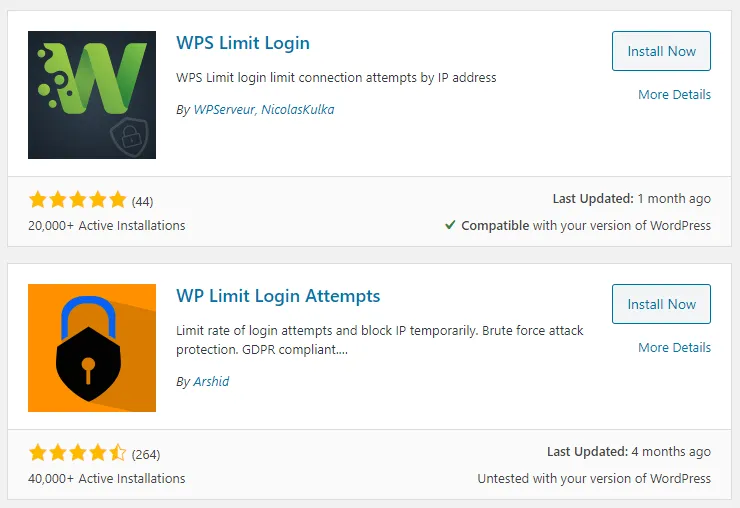
Note that if you’re paying for a premium WordPress security plugin, check it first since there’s a chance that it already has a limit login (and a two-factor authentication) feature.
Turn off file editing
Lastly, disabling your website’s file editing feature has a security benefit. By default, WordPress has a built-in code editor you can use to edit your theme and plugin files. Unfortunately, the same feature poses great risks to your website when used maliciously.
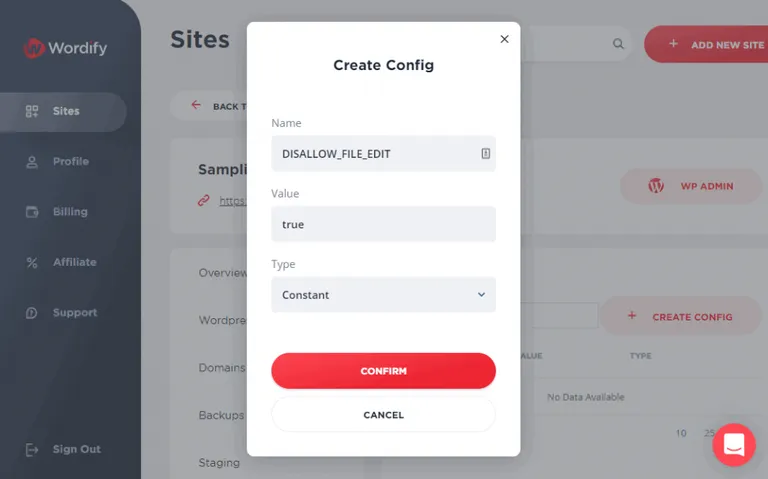
Turning this off might seem a bit technical depending on your hosting service. With Wodify, you can turn off file editing in under 10 seconds by creating a custom config file similar to what’s shown below:
But if your hosting service doesn’t have this (easy) feature, you will have to do it the long way around. This may seem a little difficult if you’re not familiar with source codes and program files. This is also the lengthiest section of this WordPress security tutorial. But we stand by our earlier statement: you will not need any technical expertise for this. 👌
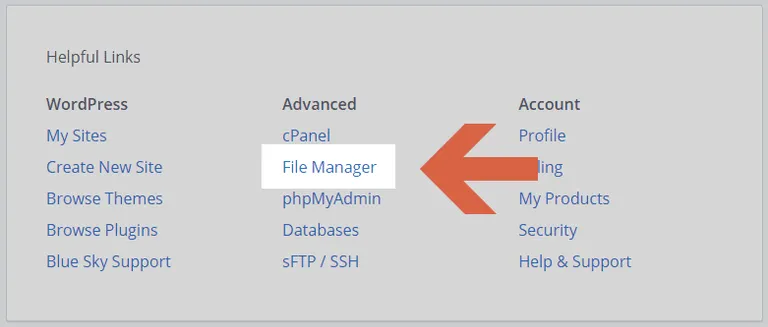
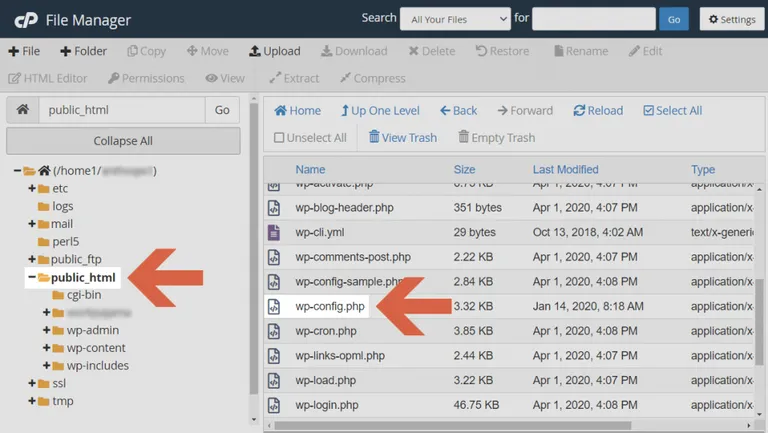
To begin with, access your File Manager through the cPanel. Some web hosting services make this more accessible by providing a direct link to the File Manager from the dashboard as shown below:
If not, you can also find it in the FILES section of the cPanel box.
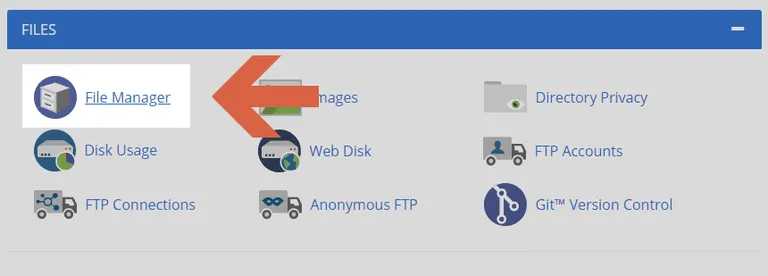
The File Manager works in the same way as Windows Explorer or Mac Finder. What you need to do next is go to the “public_html” folder and search the “wp-config.php” file.
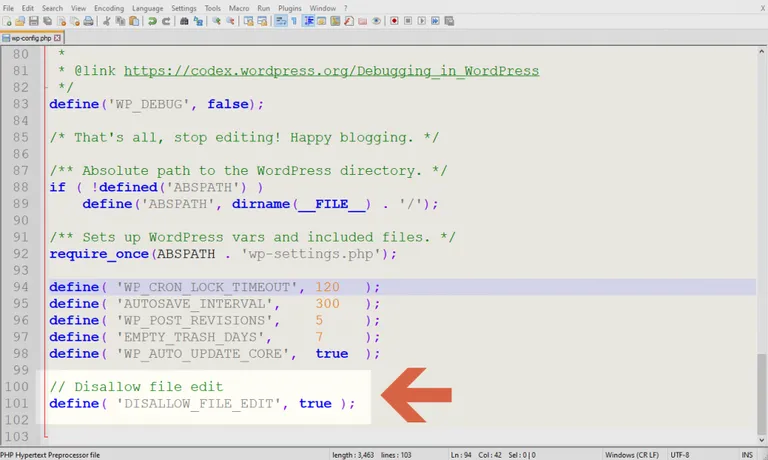
Download the file and open it using a source code editor like Notepad++ (it’s free). Then, add the following code (copy and paste) on the bottom-most part of the file.
// Disallow file edit
define( 'DISALLOW_FILE_EDIT', true );
Like this:
After that, upload the file back to the “public_html” folder through the File Manager and overwrite the file and then you’re done! 🎉 That wasn’t so hard, right? As you can see, there was no actual code writing involved.
By disabling the file editor, anyone who gets inside your website’s admin will never be able to alter any existing files. Your web host dashboard and cPanel require different login credentials so there’s little to no chance hackers will be able to do anything on your files if they ever get inside your website.
Fortify your WordPress website’s security ASAP
You never know when your website will be attacked. It’s better to prepare as soon as possible. Again, security threats will always be present. They will also evolve as technology evolves.
That’s why you should also keep on updating your website security. And if you want to do it the easier way, use a managed WordPress hosting like Wordify. That way, you’ll have fewer things to worry about. 🙂